When it comes to photography and the images I produce, I have one goal and that goal is to make the image look the best that I can possibly make it. I do not think that many readers of this blog differ from me; but there are plenty of photographers out there that believe that the process is over once they have clicked the shutter. Now I don’t have a problem with that per se. When it comes to certain genres of photography, that should be the end of the road. I sometimes delve off into those genres myself and my images pretty much stay true to form but……………………………………

I will just knock this out now, I shoot RAW exclusively. I understand and appreciate those photographers out there that have to shoot JPEG because of deadlines because in all honesty, the shooters that have to shoot JPEG that I follow are light years ahead of me when it comes to photography. Those guys and gals have to be on their game to produce high quality imagery that is ready for prime time right then and there. Us RAW shooters, we are allowed some leeway if the exposure is off or the image is unlevel. When I first started, I was in the MANUAL OR GO HOME camp. I scoffed at photographers who shoot in AUTO. I would use APERTURE PRIORITY when I shot some bracketed exposures for HDR work, but other than that, I shot in Manual Mode. Then I started playing with my motorsports work and SHUTTER PRIORITY came into use. Now, I use those two modes almost exclusively. The only time I deviate from that is when my scene gets real hinky, or if I’m doing night/astrophotography work, which I do not do nearly enough of.
Back on track; when I started my craft, I quickly learned the importance of processing my pics. Even if I was not going to get crazy, I still loaded everything up into Adobe Lightroom and made some minor tweaks. The biggest hang up I had for a long time was skin tones. I had figured it out on my own, but it still was not good enough and I would search Google for hours on end until I came across one website and low and behold, the writer of the blog that I stumbled across had given the world a basic list of settings in Lightroom’s HSL section so photographers around the world could get real close, or even nail skin tones easily and quickly. Real quick, if you follow a group of portrait photographers on Facebook, pay attention to the skin tones of their work that they post. You will quickly identify the photographers who either don’t process. The skin tones will be “off” and if you really look at the image, you will notice the white balance is off. I will talk more about this later.
It took me about a year to figure out my motorsports work. Even though I was steadily attracting a little attention with it, I had hit a wall creatively. I then gathered myself under the learning tree and educated myself on how I could shoot better. One of the things that I had already figured out was my processing. When I say I shoot motorsports, it’s actually a pretty narrow focus as I shoot off road racing around Texas and Oklahoma. Earlier this year, I had the honor of being able to go to California and shoot The King Of The Hammers race. When I get home and load my race images up into Lightroom, I’ll spend an hour or two culling the images. After that, I will take that final selection of images and hit them with some basic post processing. Contrast, Black, Clarity, Saturation, Noise Reduction and the skin tone settings I talked about earlier. The reason for the skin tone tweaks is this, colors such as Red and Orange coming out of a Pentax generated RAW file are not true, and from what I have seen from other makes, this stays true across the board. I want my colors to be true in most cases, especially with most motorsports images that I produce. There’s one particular car that I have had the chance to photograph a few times and it is primarily orange, but in most of the images I see of it online, the orange is more red. White balance also plays a part in this, but I will confess, I have gone away from setting my white balance manually to leaving my camera in AWB. This is not a big deal with a lot of stuff, but when I am out shooting a race all day long, it could start in the morning during Golden Hour, last all day and finish up as the sun sets. There might also be issues with clouds moving in and out. When I had white balance set manually, it just added to my processing time. With AWB, I very rarely have to tweak it in Lightroom.
With the final selection, I’ll identify a set of images that will go past the basic post process and I will go crazy with those images. With off road race vehicles, and especially with the unlimited vehicles, there’s a certain amount of “power” and “grit” that I want to translate to the viewer of those images. My focus with my weather photography is the same. I want to invoke emotions of Mother Nature’s power to the viewer of my weather images.
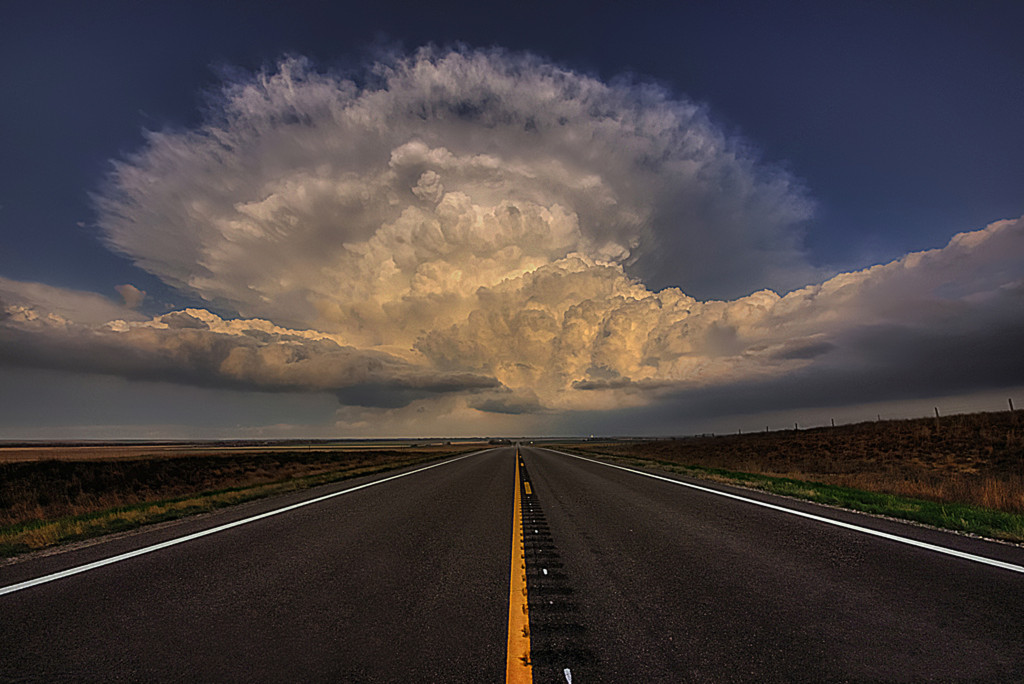
In this post, I am going to go over how I processed one of my images. The following image is of the backside of a storm that I chased in July of 2013. The front side of the storm never presented an opportunity for a good image, so I had the fortunate luck of getting to go through the center of this storm. If you have never had the opportunity to attempt to navigate through the center of a High Plains thunderstorm, DON’T!!! This particular storm came up fast and I was left without any “out” to go around, so I went through the center. Luckily, the hail was not large, but the wind was kicking and I am pretty sure I saw Toto flying through the air at one point. I came out on the other side at Elkhart, Kansas. It was late afternoon, so the backside was lit up just right. I’m a sucker for “road” shots and when I saw this view, I stopped and setup. The image was shot in Aperture Priority, f/11, 1/180, ISO 100. Simple and to the point. The image is straight out of the camera and to me, it’s flat boring.

The software package that I have consists of the usual suspects; Lightroom and Photoshop. I am an HDR fan, so I have Photomatix and I also have the Nik software package. In other words, I have an entire cluster of software that will allow me to go almost anywhere I want with an image in post. I will say this though, you do not have to spend a gob of money of software. In fact, Lightroom has all of the tools needed to make this image a wall hangar in just a few minutes.
For the final image below, and I will confess, this is the third version of a final image for this particular image. The first version is black and white, the second is color and then the one I’m showing, which is color. The difference between the two color versions is in the clouds and both versions are very different in that regard.
The final version got the basic post tweaks in Lightroom and then it went into Photoshop. Shortly before I worked up this version, I had heard a podcast with Mike Olbinski and he talked about the way he processes his storm images. I pulled out a little tidbit from him and used it to see the results. Before that, I would usually load an image into Nik Color Efex from Photoshop and use that to bring out the details. Mike told the podcast audience that he loads an image into Photoshop, then will go into Nik Silver Efex to bring out the details, go back into Photoshop and switch the blending mode of that layer to Luminosity to bring back the color. I tried that way and immediately fell in love with it. To me, it made me feel like I had even more control than by using Color Efex.
I just started really learning about the power of layers in Photoshop this year after reading a book about portrait processing. I have spend months on end teaching myself how to use layers to their full potential.
With this image, once it was back in Photoshop and the blending mode switched, it was time to play with the colors. With this particular image, I wanted it to have deep, bold blues. I created a transparent layer on top and switched to Soft Light, I began painting in blue to the clouds. Once I had the clouds covered in blue, I turned the transparency of the layer down so the blue would not “blow out” the image. Using the same method, I also added some color to the road. In the end, even though the other two versions of the image have a little more “oomph” in the details, this is the one that I picked to print for a show.

Now before someone from the SOOC purist crowd demands my head on a pike, it will not do any good. To me, photography is an art form. For most images out there, even for those images that need to be “as is”, the final image is created from the photographer’s vision. My vision may not mesh with someone else’s vision, but I shoot for myself first and foremost. In fact, my “photography wife” as my legal wife calls her, has a completely different vision in her process than mine. We shoot together on a semi regular basis and we could shoot the same exact thing at the same time and our final images will be vastly different.
One can see all over the Internet people asking other photographers what lens, what camera, and in a lot of cases, what step by step instructions the photographer used to complete the final image. If you look around, there is a lot of backlash against those types of questions and requests. There is a cottage industry of presets for sale and plenty of folks who think by buying a preset will be the end all, be all. It’s not. I do have a collection of free presets I have gathered, but I have yet to buy one and in the end, a preset is just part of the equation. I have a full time job and very little free time. I’m still on the lower end when it comes to gear and I am now and have been working my butt off to make photography my primary source of income, but funds are still tight. The Internet is chock full of free information and that is where I have to go to learn something. I have about $100 tied up in educational material and that’s it. Most of what I have learned about photography has been by just doing it, reading blogs or finding stuff on Youtube. You will be amazed, most of the photographers you see on videos that hold workshops, sell videos and presets will toss out morsels here and there that will make your talent jump light years.
In closing, it’s not about how you got there, unless of course it was driving through the middle of a thunderstorm, but what you got. Just because Photographer A uses Brand X camera doesn’t mean you have to either. Just because I use a whole list of software programs to process my work doesn’t mean you have to either. The end result is producing eye catching imagery that stays true to your vision.
Feel free to follow me on Facebook at www.facebook.com/blackmesaimages. I don’t update my website much, but you can see it at www.blackmesaimages.com

Stanley Harper
Latest posts by Stanley Harper (see all)
- Photography Gear: A Photographers Tool Box Exposed - February 9, 2015
- Selling Your Photography - December 27, 2014
- How to Protect Your Photography From Thieves - December 16, 2014
Related posts: